Sarah stood in her bathroom doorway at 6:30 AM, coffee mug in hand, staring at what used to be pristine white grout lines around her shower. Somewhere between moving in three years ago and this Tuesday morning, those clean lines had transformed into a dingy gray maze that made her beautiful subway tiles look cheap and neglected.
She’d scrubbed with every cleaner under her sink. She’d even bought one of those fancy steam cleaners that promised to “lift years of grime.” The tiles sparkled afterward, but those grout lines? They mocked her efforts, staying stubbornly discolored despite hours of work.
The contractor’s estimate for regrouting sat crumpled in her kitchen drawer: $1,200 and a week without her main bathroom. There had to be a better way to clean tile grout without starting from scratch.
Why dirty grout makes everything look worse than it actually is
Here’s the thing about grout that most people don’t realize until it’s too late. It’s essentially a porous concrete that acts like a sponge, absorbing everything from soap scum to coffee spills to the microscopic dirt that regular mopping pushes around but never removes.
- This 25-minute Sunday bathroom trick keeps it spotless all week without daily scrubbing
- This grey hair trend is making women look 10 years younger without a single drop of dye
- Hairstylists quietly agree: this specific cut makes women over 60 look more alive than any other style
- China’s empty metro stations in 2008 fooled everyone—here’s what we missed about their master plan
- Tesla Cybertruck won’t start after two weeks of charging: owner discovers shocking reason
- HVAC experts reveal why closing vents in unused rooms secretly drives up your heating bills instead
“Most homeowners think they’re cleaning their grout when they mop, but they’re really just moving surface dirt around,” explains Mike Chen, a tile restoration specialist with 15 years of experience. “The real stains are living deep in those pores, and standard floor cleaners can’t reach them.”
That’s why your floors can look spotless for about ten minutes after mopping, then suddenly the grout lines seem to reappear darker than ever. You’re not imagining it. The contrast between clean tiles and unchanged grout makes the staining look even more obvious.
Clean tile grout transforms a space instantly. Walk into any home renovation show’s “after” reveal, and your eye goes straight to those crisp, uniform lines between tiles. It’s the difference between a room that looks maintained and one that looks tired, regardless of how expensive the tiles were originally.
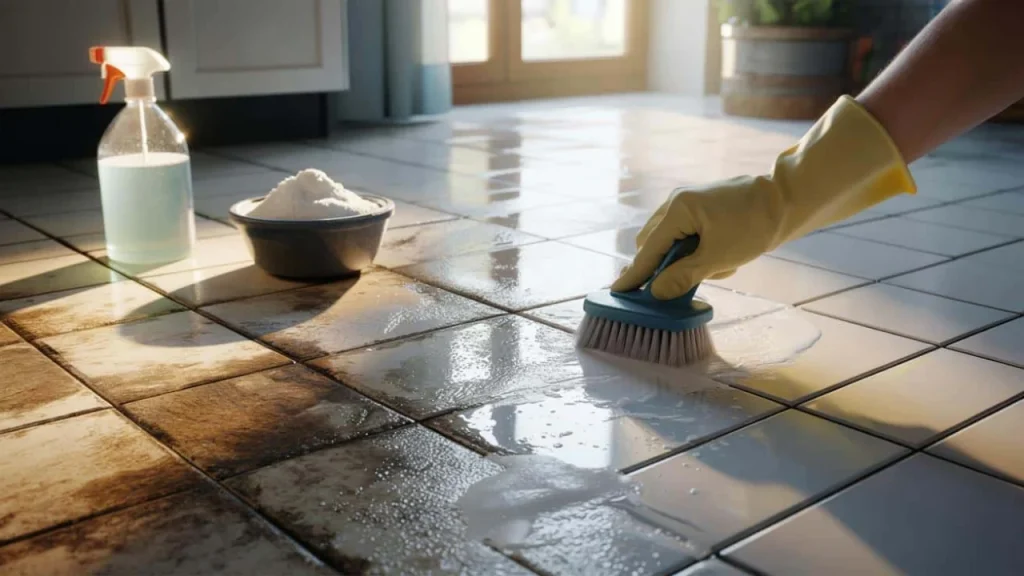
The simple mixture that actually works on stubborn grout
The trick that’s been quietly working in homes across the country involves three common household ingredients that create a powerful but gentle cleaning paste. Unlike harsh chemical cleaners that can damage grout over time, this method actually penetrates the pores without causing deterioration.
Here’s what you need and exactly how to use it:
| Ingredient | Amount | Purpose |
|---|---|---|
| Baking soda | 3/4 cup | Gentle abrasive to lift stains |
| Hydrogen peroxide (3%) | 1/4 cup | Whitening agent and disinfectant |
| Liquid dish soap | 1 tablespoon | Helps mixture stick and penetrate |
Mix these ingredients into a thick paste. The consistency should be similar to toothpaste – thick enough to stay put on vertical surfaces but spreadable enough to work into the grout lines.
The application technique matters just as much as the mixture:
- Apply the paste directly to grout lines using an old toothbrush or small paintbrush
- Let it sit for 10-15 minutes (no longer, or it can dry out and become harder to scrub)
- Scrub with a firm toothbrush in small circular motions
- Rinse thoroughly with warm water
- Dry completely with a clean towel
“The key is patience and the right tool,” says Jennifer Walsh, a professional house cleaner who’s been using this method for over a decade. “People try to clean grout with a mop or big brush, but you need something small enough to really work the cleaning solution into those narrow spaces.”
What happens when you finally get the grout clean
The results can be dramatic enough that you’ll wonder why you waited so long to try this method. Homeowners frequently report that their bathrooms and kitchens look “like new” after cleaning the grout properly, even when the tiles themselves are years old.
But the benefits go beyond just appearance. Clean grout is also healthier grout. Those dark stains often contain mold, mildew, and bacteria that can affect indoor air quality, especially in bathrooms and kitchens where humidity is higher.
“I had a client whose teenage daughter kept complaining about allergies, but only when she was getting ready in the bathroom,” recalls Tom Rodriguez, an indoor air quality specialist. “After they deep-cleaned the shower grout using this method, her symptoms improved significantly within a week.”
The financial impact is worth considering too. Professional grout cleaning services typically charge $200-400 for an average bathroom, while complete regrouting can run $800-1,500 depending on the size of the space. This DIY method costs less than $5 in materials and can be repeated as needed.
When this trick won’t work and what to try next
This method works exceptionally well for standard dirt, soap scum, and mild discoloration. However, some situations require a different approach or professional help.
The paste method may not be sufficient for:
- Grout that’s cracking or crumbling (this needs repair, not just cleaning)
- Heavy mold growth that’s penetrated deep into the grout
- Oil-based stains from cooking or mechanical work
- Grout that’s been sealed with a colored sealant that’s now wearing off unevenly
For these tougher cases, you might need to try an oxygen bleach solution (stronger than hydrogen peroxide but gentler than chlorine bleach) or consider having the grout professionally steam-cleaned before resealing.
“The beauty of trying the baking soda method first is that it’s completely safe,” notes cleaning expert Walsh. “If it doesn’t work, you haven’t damaged anything, and you can always escalate to stronger methods or call in professionals.”
Most homeowners find that this simple trick solves their grout problems completely, transforming their floors and walls back to their original appearance with just a few hours of focused work. The key is consistency – clean tile grout regularly with this method, and you’ll never face that overwhelming “time to rip it all out” moment again.
FAQs
How often should I clean my grout with this method?
For most homes, deep-cleaning grout every 3-4 months prevents heavy buildup and keeps it looking fresh.
Can I use this paste on colored grout?
Yes, but test it in an inconspicuous area first, as the hydrogen peroxide may lighten some colored grouts slightly.
Is this method safe around pets and children?
Absolutely. All ingredients are household-safe, but as with any cleaning, ensure good ventilation and keep kids and pets away until the area is rinsed and dried.
What if the grout is still stained after trying this method?
Try letting the paste sit for up to 20 minutes, or repeat the process a second time before considering stronger chemical cleaners.
Can I use a power drill with a brush attachment instead of scrubbing by hand?
Yes, but use the lowest speed setting and be gentle to avoid damaging the grout or surrounding tiles.
How long does it take to clean an average bathroom with this method?
Plan for about 2-3 hours including application time, waiting, scrubbing, and thorough rinsing for a standard bathroom.