I was standing in my kitchen last Tuesday morning, coffee in hand, when it hit me. Not the caffeine – the realization that my once-white grout had turned into sad, grayish lines that made my entire backsplash look defeated. You know that moment when you suddenly see what you’ve been ignoring for months? The grout wasn’t just dirty anymore. It was embarrassing.
My sister had mentioned something weeks earlier about a “miracle grout cleaner” she’d found online, but I’d brushed it off as another internet hack that sounds too good to be true. Three ingredients, she said. Fifteen minutes. I figured she was exaggerating until I found myself staring at those depressing lines, wondering how much a professional cleaning service would cost.
That’s when I decided to give her “miracle” method a try. Spoiler alert: sometimes the internet actually delivers.
Why grout cleaning becomes everyone’s nightmare
Here’s the thing about grout that nobody tells you when you’re admiring those beautiful tile displays at the home improvement store. Grout is basically a sponge masquerading as a solid surface. It’s porous, which means every bit of moisture, soap residue, cooking grease, and daily grime seeps right into it.
- Just half a glass: the surprising toilet bowl trick that’s making old bathrooms look brand new
- Engineers quietly began drilling the world’s first underwater rail line connecting entire continents
- People who sleep with their pets share 10 hidden personality traits psychologists just discovered
- Why France is Europe’s only country that can build fighter jet engines this precisely
- Tesla Cybertruck owner discovers charging cable left plugged in for two weeks created unexpected problem
- This forgotten soak brings dead cast iron pans back to perfect black finish in hours
“Most homeowners think regular mopping will keep grout clean, but surface cleaning barely touches the embedded dirt,” explains Maria Rodriguez, a professional house cleaner with 15 years of experience. “The stains are living inside the grout, not just sitting on top.”
This is why your bathroom tiles can sparkle while the grout lines still look like they belong in a different decade. Traditional cleaning methods – even strong commercial cleaners – often fail because they can’t penetrate deep enough to lift out the embedded grime.
The worst part? Dirty grout makes your entire room look neglected, even when everything else is spotless. Those dark lines create visual boundaries that your eye immediately notices, turning beautiful tilework into a constant reminder of cleaning failure.
The three-ingredient grout cleaning solution that actually works
After years of buying expensive grout cleaners that promised the world and delivered disappointment, this simple mixture changed everything. The secret lies in combining ingredients you probably already have in your kitchen.
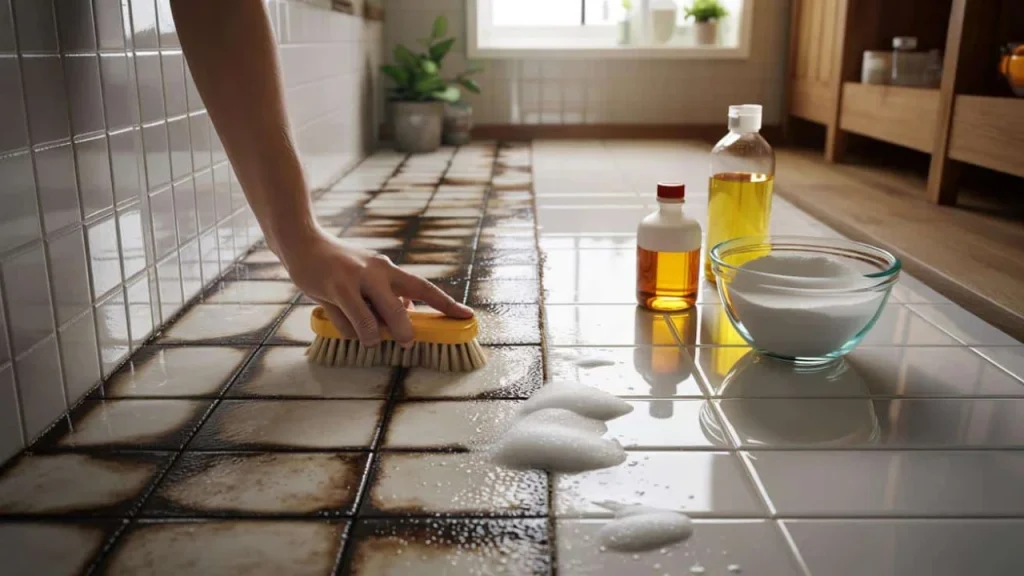
Here’s what you need:
- Baking soda (2 parts)
- White vinegar (1 part)
- Liquid dish soap (1/2 part)
“The magic happens when these three ingredients work together,” says home improvement expert Tom Bradley. “The baking soda acts as a gentle abrasive, the vinegar dissolves mineral deposits and kills bacteria, while the dish soap helps lift grease and grime.”
The application process couldn’t be simpler. Mix the ingredients into a paste-like consistency, apply it to the grout lines using an old toothbrush, let it sit for 15 minutes, then scrub gently and rinse with warm water.
| Ingredient | Amount | Purpose |
|---|---|---|
| Baking soda | 2 cups | Gentle abrasive, neutralizes odors |
| White vinegar | 1 cup | Dissolves mineral deposits, kills bacteria |
| Dish soap | 1/2 cup | Cuts through grease, helps mixture stick |
What makes this combination so effective is the chemical reaction between the vinegar and baking soda. When they meet, they create a fizzing action that helps lift dirt from the porous grout surface. The dish soap acts as a binding agent, keeping the mixture in place long enough to work its magic.
Why this method beats expensive commercial cleaners
I’ve spent more money than I care to admit on grout cleaning products that promised professional results. Bleach-based cleaners that made my bathroom smell like a swimming pool. Specialty brushes with weird angles. Even a steam cleaner that took up half my storage closet.
None of them worked as well as this simple three-ingredient mixture.
Commercial grout cleaners often rely on harsh chemicals that can actually damage grout over time. Chlorine bleach, for example, can break down the binding agents in grout, making it more porous and prone to future staining.
“The beauty of the baking soda and vinegar method is that it’s tough on stains but gentle on surfaces,” notes cleaning specialist Jennifer Walsh. “You’re not introducing harsh chemicals that could weaken your grout or create health concerns in enclosed spaces.”
Plus, the cost difference is remarkable. A typical commercial grout cleaner costs $8-15 and might clean your bathroom once. The three ingredients for this DIY solution cost about $5 total and will handle multiple cleaning sessions throughout your entire home.
The time factor is equally impressive. Most commercial products require multiple applications, scrubbing sessions, and waiting periods. This mixture works in one 15-minute session.
Real results from real people
Sarah Mitchell from Portland tried this method on her master bathroom after struggling with discolored grout for two years. “I was planning to rip out the tile and start over,” she says. “Fifteen minutes with this mixture, and my husband asked if I’d hired professional cleaners.”
The method works on different types of grout and various stain sources. Kitchen grease stains, bathroom mold, general dirt buildup – the combination tackles them all without requiring different products for different problems.
Even heavily stained grout shows dramatic improvement after just one treatment. For stubborn stains that have been building up for years, a second application usually does the trick.
“I’ve recommended this to at least a dozen friends, and every single one has been amazed by the results,” adds cleaning professional Maria Rodriguez. “It’s become my go-to solution for clients who want professional results without professional prices.”
The best part is watching your entire room transform. Clean grout lines make tiles look newer, colors appear brighter, and the whole space feels more polished and well-maintained.
FAQs
Is this mixture safe for all types of grout?
Yes, this gentle combination works safely on most grout types, including sanded and unsanded varieties.
How often should I use this cleaning method?
For maintenance, once every 2-3 months is usually sufficient for most households.
Can I store the mixture for later use?
It’s best to mix fresh each time since the ingredients work most effectively when freshly combined.
What if my grout is extremely stained?
For heavily stained grout, you may need two applications, but let the first treatment dry completely before applying again.
Do I need special tools for scrubbing?
An old toothbrush works perfectly for most situations, though a grout brush can make the job easier for large areas.
Will this method work on colored grout?
Yes, but test in an inconspicuous area first to ensure the cleaning doesn’t affect the color.