Last Sunday, my neighbour knocked on my door, tears in her eyes. She’d been trying to recreate her late grandmother’s crème caramel for her daughter’s birthday—the same dessert that had graced every family celebration for decades. But after three failed attempts, she was left with a kitchen full of curdled, weepy disasters and a broken heart.
We’ve all been there. You follow a recipe to the letter, yet somehow your homemade crème caramel comes out looking like scrambled eggs floating in burnt sugar water. It’s heartbreaking, especially when this humble French dessert should be the epitome of comfort and elegance.
The truth is, making perfect homemade crème caramel isn’t about having fancy equipment or secret ingredients. It’s about understanding one crucial technique that transforms this temperamental dessert into a foolproof masterpiece every single time.
Why homemade crème caramel breaks so many hearts
Crème caramel has this sneaky way of exposing every weakness in your technique. One degree too hot, and your custard curdles. Rush the caramel, and you’ll taste bitter disappointment instead of silky sweetness. Wait too long to unmould, and your beautiful creation cracks like a broken promise.
“The biggest mistake people make is treating crème caramel like a quick dessert,” explains pastry chef Marie Dubois, who has been perfecting this classic for over twenty years. “It demands patience and respect for gentle heat.”
The magic lies in understanding that you’re essentially creating two separate components that must work in perfect harmony: a delicate custard and a liquid caramel that needs to stay pourable even after cooling.
Here’s what separates success from disaster: the temperature of your ingredients when they meet, and the precise moment you stop cooking your caramel.
The game-changing technique that guarantees success
The secret isn’t in the ingredients—it’s in the method. Professional pastry chefs use what’s called the “tempering technique” to prevent the eggs from scrambling when they meet the hot milk.
But there’s an even more crucial step that most home recipes skip entirely: letting your caramel cool for exactly three minutes before adding it to your moulds. This prevents the caramel from being too hot (which would crack your ramekins) or too cool (which would harden before coating evenly).
| Step | Temperature | Timing | Why it matters |
|---|---|---|---|
| Heat milk | 80°C (176°F) | 5-7 minutes | Hot enough to infuse vanilla, not boiling |
| Make caramel | 180°C (356°F) | 8-10 minutes | Perfect amber colour, liquid consistency |
| Cool caramel | Room temperature | 3 minutes exactly | Coats moulds without cracking |
| Bake custard | 160°C (320°F) | 35-40 minutes | Gentle heat prevents curdling |
Essential ingredients for authentic flavour
Forget complicated ingredient lists. Traditional homemade crème caramel needs just five simple components, but the quality of each one matters enormously.
- Whole milk (500ml) – provides the creamy base without the richness of cream that can mask delicate flavours
- Large eggs (3 whole + 3 yolks) – creates the perfect balance of structure and silkiness
- Caster sugar (130g total) – 80g for custard, 50g for caramel
- Pure vanilla extract or one vanilla pod – adds warmth without competing with caramel
- Pinch of sea salt – enhances sweetness and prevents the caramel from becoming cloying
“Never substitute ingredients in crème caramel,” warns chef Antoine Moreau, whose restaurant has served the same recipe for thirty years. “Each component has a specific job, and changing one affects everything else.”
The ratio of whole eggs to yolks determines your final texture. More whole eggs give you a firmer, sliceable result—perfect if you’re serving at a dinner party. Extra yolks create that restaurant-quality wobble that makes people close their eyes in bliss.
The foolproof step-by-step method
Here’s where most recipes go wrong: they rush through the crucial steps that make or break your dessert.
Start by making your caramel in a heavy-bottomed saucepan. Add your sugar in an even layer and resist the urge to stir. Watch for the edges to start browning, then gently tilt the pan to help even cooking. You want a deep amber colour—think golden honey, not pale yellow.
The moment your caramel reaches the perfect shade, remove it from heat and count to ten. This stops the cooking process and prevents bitterness. Then pour immediately into your ramekins, tilting each one to coat the bottom evenly.
For the custard, heat your milk with vanilla until it’s steaming but not bubbling. In a separate bowl, whisk eggs and sugar until just combined—overwhisking creates foam that ruins the smooth texture.
Here comes the crucial part: pour the hot milk into the eggs in a thin, steady stream while whisking constantly. This gradual process prevents the eggs from cooking instantly.
“The tempering step is where beginners panic,” notes culinary instructor Sarah Chen. “Take your time—thirty seconds of careful pouring saves you from starting over.”
Strain your custard mixture through a fine sieve to remove any lumps or foam bubbles. Pour gently over the caramel in your ramekins, leaving about 5mm from the rim.
Baking secrets that guarantee silky perfection
The baking phase separates amateur attempts from professional results. Place your filled ramekins in a deep baking dish and pour hot water halfway up their sides. This water bath (called a bain-marie) provides gentle, even heat that prevents curdling.
Cover the entire dish tightly with foil—this stops a skin from forming on your custards. Bake at 160°C for 35-40 minutes, until a knife inserted near the edge comes out clean but the centre still has a slight wobble.
The cooling process is just as critical as the cooking. Let your crème caramels cool completely at room temperature before refrigerating for at least four hours, preferably overnight.
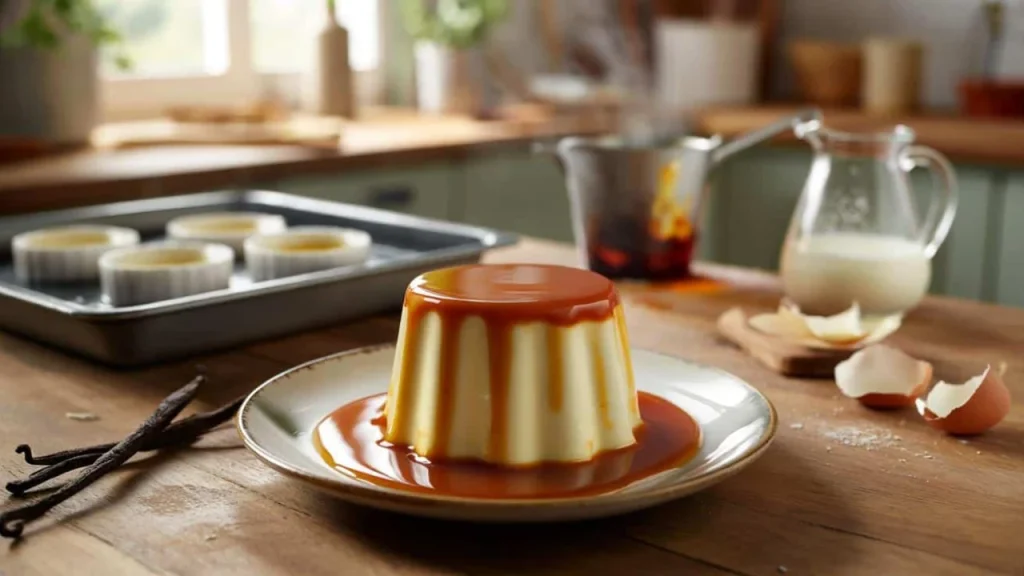
When you’re ready to serve, run a thin knife around the edges and briefly dip the bottom of each ramekin in warm water. Invert quickly onto your serving plate and listen for that satisfying ‘plop’ as the caramel releases.
“Perfect crème caramel should tremble slightly when you touch the plate,” explains dessert specialist Lisa Fontaine. “If it sits completely still, you’ve overcooked it. If it collapses, you didn’t cook it enough.”
Common mistakes that ruin your hard work
Even experienced cooks stumble with homemade crème caramel. The most devastating mistake? Opening the oven door during baking. This temperature shock can cause your custards to curdle or crack.
Another disaster happens when people try to speed up the cooling process. Putting hot custards directly into the fridge creates condensation that dilutes your caramel and creates a watery mess.
Finally, many home cooks panic when unmoulding and try to force stubborn caramels out of their moulds. Patience wins here—if it doesn’t release easily, dip it in warm water again and wait another minute.
FAQs
How long does homemade crème caramel keep in the fridge?
Properly stored crème caramel stays fresh for up to three days, though it’s best enjoyed within 24 hours of making.
Can I make crème caramel without a vanilla pod?
Yes, use two teaspoons of pure vanilla extract added to the cooled milk instead of infusing with a pod.
Why did my caramel turn bitter?
You cooked it too long or at too high heat. Stop cooking when it reaches deep amber—it continues cooking from residual heat.
Can I use individual moulds other than ramekins?
Absolutely. Metal moulds work beautifully and conduct heat more evenly than ceramic, just reduce cooking time by 5-7 minutes.
What if my custard has bubbles on top after baking?
Those bubbles form when you whisk too vigorously or don’t strain the mixture. They don’t affect taste, just appearance.
Is it possible to make one large crème caramel instead of individual ones?
Yes, but increase baking time to 50-60 minutes and test doneness carefully—the centre should still have a slight wobble when done.