Sarah stared at her living room wall in horror. What started as a simple weekend project—taking down old picture frames and giving the place a fresh look—had turned into a demolition zone. Where once there were neat little holes, now gaping craters dotted the wall like a connect-the-dots puzzle gone wrong.
She’d yanked out each wall plug with pliers, feeling satisfied when they finally popped free. But satisfaction quickly turned to dread as chunks of plaster came with them, leaving behind wounds that would require serious repair work.
Sound familiar? You’re definitely not alone. Thousands of homeowners face this exact scenario every year, turning what should be a simple refresh into an expensive nightmare.
Why Your Wall Becomes a Casualty of War
Here’s the thing about wall plug removal—those little plastic anchors aren’t designed to come out easily. They’re engineered to grip your wall like their life depends on it, because in a way, it does.
When you installed that plug originally, it either expanded inside a solid wall or opened up behind plasterboard like a tiny umbrella. The harder you pull, the more it fights back. And guess what gives way first? Not the tough plastic plug—it’s your brittle wall surface.
“Most people treat wall plug removal like they’re pulling a nail,” explains home renovation specialist Mike Chen. “But these anchors are designed with expansion mechanisms that make straight pulling the worst possible approach.”
The result is predictable: chipped paint, crater-sized holes, and sometimes even hairline cracks that spread outward from the damage. What started as a 10-minute job suddenly requires spackling, sanding, priming, and repainting entire wall sections.
The Game-Changing Technique That Actually Works
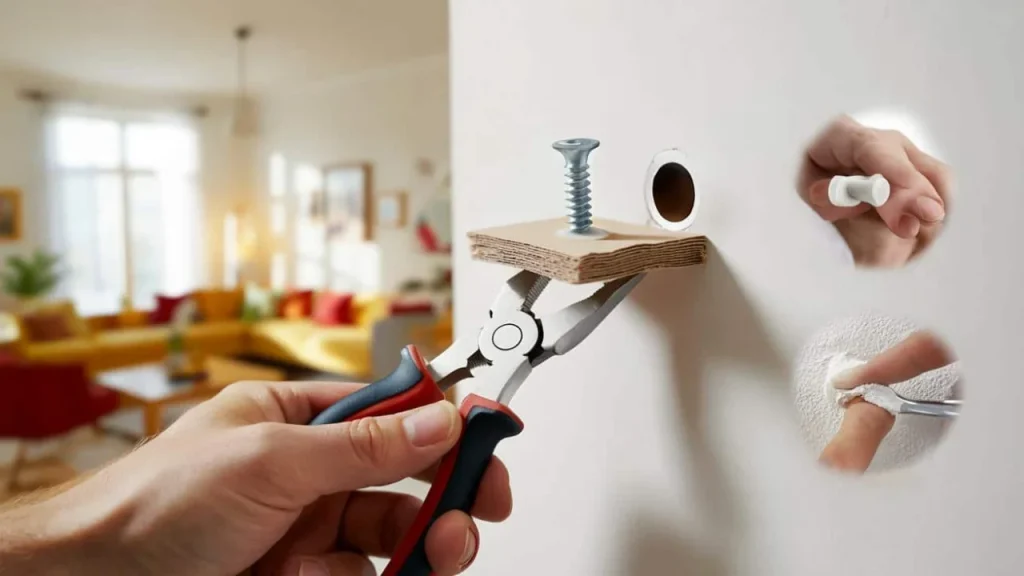
Here’s where most DIY guides get it wrong—they focus on removal tools when the real secret is creating leverage. Professional contractors know that wall plug removal isn’t about brute force; it’s about giving yourself something to work with.
The method is surprisingly simple, but the results speak for themselves. Instead of attacking the plug directly, you’re going to give it a handle first, then use that handle to coax it out gradually.
| Traditional Method | Professional Method |
|---|---|
| Grip plug with pliers | Insert screw to create handle |
| Pull straight out with force | Use gentle rocking motion |
| Results in large holes | Leaves original drill hole intact |
| Requires extensive patching | Needs minimal filler |
Here’s your step-by-step approach:
- Find a screw that fits: Look for one that threads into the plug without being too tight
- Screw it in partway: Leave about half an inch sticking out—this becomes your handle
- Grip the screw head: Use pliers on the screw, not the plug itself
- Rock it out gently: Small back-and-forth motions work better than straight pulling
- Work patiently: Let the plug gradually work its way free
“The screw method changes everything,” says contractor Lisa Martinez. “Instead of fighting the plug’s expansion mechanism, you’re working with it. The plug stays intact, and so does your wall.”
What You’ll Need for a Perfect Repair
The beauty of this approach is that you probably already own everything required. No special tools, no expensive equipment—just common household items that deliver professional results.
Your basic toolkit should include:
- Various screws (different sizes for different plug types)
- Needle-nose pliers or standard pliers
- Small screwdriver set
- Ready-mixed wall filler
- Flexible putty knife
- Fine-grit sandpaper (120-180 grit works perfectly)
- Small brush for cleanup
The filler part is crucial, but here’s what most people don’t realize—when you remove plugs correctly, you’re only filling the original drill holes. That means less mess, less drying time, and a much cleaner finish.
When Things Don’t Go According to Plan
Sometimes even the best technique hits a snag. Maybe the plug is painted over, or it’s been in the wall for decades. Don’t panic—there are backup strategies that still beat the brute-force approach.
For stubborn plugs, try heating them slightly with a hair dryer. The warmth can soften plastic plugs just enough to make removal easier. Metal cavity anchors might need a different approach—sometimes pushing them through to the cavity behind is actually cleaner than pulling them out.
“I’ve seen people spend hours trying to extract one stubborn plug,” notes DIY expert James Rodriguez. “Sometimes the smartest move is to drive it deeper and fill over it, especially in cavity walls where there’s space behind.”
If the plug breaks during removal, don’t despair. A broken plug often comes out in pieces, which can actually be easier to manage than trying to extract it whole. Use a small screwdriver to work out the fragments, then fill the hole as normal.
The Finishing Touch That Makes All the Difference
Here’s where attention to detail separates amateur repairs from professional-looking results. Once your plugs are out and holes are filled, the finishing work determines whether anyone can tell you ever had fixtures there.
After the filler dries completely, sand it flush with the surrounding wall. The key is using light, circular motions rather than aggressive back-and-forth scrubbing. You want the repair to blend seamlessly, not create a smooth spot that stands out against textured wall surface.
Prime before painting, even if you’re using paint-and-primer combinations. Filled areas absorb paint differently than the surrounding wall, and primer ensures uniform coverage. This extra step takes minutes but makes hours of difference in the final appearance.
FAQs
What if I don’t have a screw that fits the wall plug?
Try a slightly smaller screw and thread it in carefully, or visit a hardware store—they usually have sample screws you can test-fit.
Can this method work on all types of wall plugs?
Yes, it works on plastic plugs, metal anchors, and even toggle bolts, though the technique may need slight modifications for each type.
How long should I wait before painting over the repair?
Most fillers need 2-4 hours to dry completely, but check the manufacturer’s instructions and ensure the surface feels completely dry before sanding.
What if the plug spins when I try to screw into it?
This usually happens with loose plugs—try holding the plug steady with one hand while screwing with the other, or use needle-nose pliers to grip the plug edges.
Is it worth removing plugs that are flush with the wall?
If they’re not visible and you’re just painting over them, you can leave them in place, but removing them gives cleaner results and prevents future issues.
Can I reuse wall plugs after removing them this way?
Generally no—the removal process usually damages the expansion mechanism, so it’s better to use fresh plugs for new installations.